Drivers configuration
Associating a communication driver with the project means actually declaring its use within the project itself.
When a project is activated, the associated drivers are automatically started and initialized with the specific configuration data.
Device acronyms related to the drivers associated to the project are also selectable from drop-down lists for filling the Device fields of the items.
Note: the Device fields can also be filled in by manually typing the desired acronym, regardless of the drivers associated with the project.
The Drivers Configuration window, called up by selecting Drivers from the Configure menu of the X Editor, allows you to select the drivers associated with the current project and to directly access the related configurators:
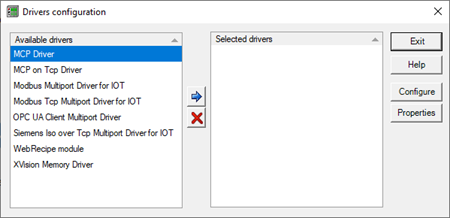
Selecting drivers for the project
In the Driver Configuration window, the left-hand list shows the drivers installed and available for use; the drivers associated with the project are displayed in the right hand list.
To add a driver to the list of used drivers:
- Select the driver you want in the list of available drivers
- Drag the drivers in the list of selected drivers
- or -
Double click on the selected driver
- or -
Push the button
- or -
Select the Add to Selected Drivers command from the context menu
To remove a driver from the list of drivers associated with the project:
- Select the driver you want to remove in the Selected Driver lits
- Drag the drivers in the list Available Drivers
- or -
Push the button
- or -
Select the Remove from the selecte drivers command from the context menu
Note: although the selection is extended graphically on multiple items, the controls are always relative to the first selected item
Configuration of the communication blocks
Most X Vision communication drivers require a configuration of data exchange areas, as well as communication parameters.
Using the Driver Configuration window you can directly access the configuration of all selected modules.
To access the configuration of the drivers associated with the project:
- Select the driver you want to configure from the list of used drivers
- Double click on the selected item
- or -
Push the Configure ... button
- or -
Select the Driver configuration command from the context menu - The system displays the configuration window for the selected driver. Through the configuration window it is possible to configure both the data exchange areas and the communication parameters.
Note: some drivers do not require the configuration of the areas of data exchange.
Dispaying driver properties
To view the properties of a driver associated with the project:
- Select the driver whose properties you want to show in the list of Selected Drivers
- Push the Property button
- or -
Select the Property command from the context menu - The system shows the Driver Properties window shown in the following figure:
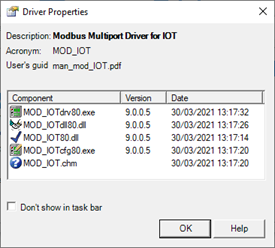
The Driver Properties window displays general driver information (description, acronym, etc.) and lists the constituent modules, displaying the version number and release date for each. This information must always be communicated when requesting technical assistance for the driver in question.
Running drivers as non-visible application
You can run the driver without that appear in the system tray (taskbar) of Windows. To activate this option, tick the checkbox Don't show in the taskbar present in the properties window of the driver (see Viewing the properties of the driver).
Note: Some drivers may not support this option.